Creating Data Elements
Before creating a new data element, you need to check whether any existing data elements have the same semantic specifications required in your table field. If so, you may use that existing data element. You can assign the data element with a predefined type, domain, or reference type.
Following is the procedure for creating the data element −
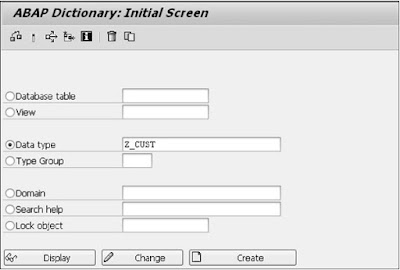
Step 1 − Go to Transaction SE11.
Step 2 − Select the radio button for Data type in the initial screen of the ABAP Dictionary, and enter the name of the data element as shown below.
Step 3 − Click the CREATE button. You may create data elements under the customer namespaces, and the name of the object always starts with ‘Z’ or ‘Y’.
Step 4 − Check the Data element radio button on the CREATE TYPE pop-up that appears with three radio buttons.
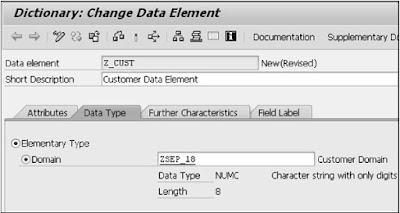
Step 5 − Click the green checkmark icon. You are directed to the maintenance screen of the data element.
Step 6 − Enter the description in the short text field of the maintenance screen of the data element. In this case, it is “Customer Data Element”.
Note − You cannot enter any other attribute until you have entered this attribute.
Step 7 − Assign the data element with the type. You can create an elementary data element by checking elementary type or a reference data element by checking Reference type. You can assign a data element to a Domain or Predefined Type within Elementary Type and with Name of Reference Type or Reference to Predefined Type within Reference Type.
Step 8 − Enter the fields for short text, medium text, long text, and heading in the Field Label tab. You can press Enter and the length is automatically generated for these labels.
Step 9 − Save your changes. The Create Object Directory Entry pop-up appears and asks for a package. You may enter the package name in which you are working. If you do not have any package then you may create it in the Object Navigator or you can save your data element using the Local Object button.
Step 10 − Activate your data element. Click the Activate icon (matchstick icon) or press CTRL + F3 to activate the data element. A pop-up window appears, listing the 2 currently inactive objects as shown in the following screenshot.
Step 11 − At this point, the top entry labeled ‘DTEL’ with the name Z_CUST is to be activated. As this is highlighted, click the green tick button. This window disappears and the status bar will display the message ‘Object activated’.
If error messages or warnings occurred when you activated the data element, the activation log is displayed automatically. The activation log displays information about activation flow. You can also call the activation log with Utilities(M) → Activation log.


No comments:
Post a Comment