Cloud Connector
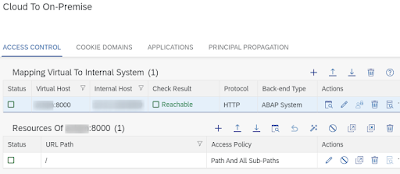
Is basically a reverse proxy with a tunnel to the btp. You can have many of these connection to a btp subaccount, identified by an ID, in this case mylocalmachine:
So far so good. The tricky bit comes when trying to consume this from your application.
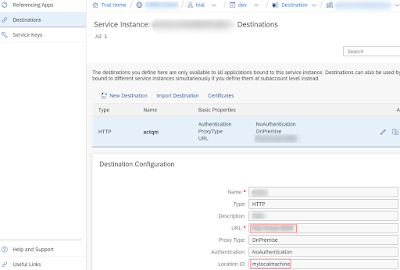
You can create a destination instance under your cloud connector and use it to test the tunnel, but as far as I can tell you can’t consume it from your application
Instead you need:
◉ a connectivity service, bound to your application
◉ a destination service, also bound to your application
◉ a destination configuration inside said instance
Bound Services
Binding a service means making it available (and discoverable) to an application
These services will now be exposed to your application with environment variable VCAP_SERVICES as a JSON document, including their credentials
You can create and bind these services in various ways:
◉ command line
◉ manually in the btp dashboard
◉ application configuration (mta.yaml or manifest.yml)
Connectivity
This is basically a proxy service. The remote url you configured in your cloud connector can’t be reached without going through it.No need to give it any detail other than a name to make it work.
Using the token_service_url, clientid and clientsecret found in connectivity[0].credentials of VCAP_SERVICES you can get a JWT token to authenticate on it:
Destination service
It’s basically a container for the remote destinations. A name is enough to create one.
Using the url, clientid and clientsecret found in destinations[0].credentials of VCAP_SERVICES you can get a JWT token to authenticate on it, and use that to get the connection details, like URL and username/password
Destination
It’s a child of a destination service, and it’s where you give cloudfoundry the details of what you want to connect to, including login details if so you wish
Putting all together
The code below is not supposed to work out of the box but should be good enough to get the gist of it. Carlos’s blog linked above, which does provide a complete sample, does a better job on that respect, this is like the tabloid version
const cfConfig = JSON.parse(process.env.VCAP_SERVICES || "{}")
const cc = cfConfig.connectivity[0].credentials
const dc = cfConfig.destination[0].credentials
const fetchJwtToken = async function (
oauthUrl: string,
clientId: string,
clientSecret: string
) {
const tokenUrl =
oauthUrl + "/oauth/token?grant_type=client_credentials&response_type=token"
const Authorization =
"Basic " + Buffer.from(clientId + ":" + clientSecret).toString("base64")
const config = { headers: { Authorization } }
return axios
.get(tokenUrl, config)
.then((response) => response.data.access_token)
}
const areadDestination = async (name: string, dc: DestinationCredentials) => {
const token = await fetchJwtToken(dc.url, dc.clientid, dc.clientsecret)
const destSrvUrl = `${uri}/destination-configuration/v1/destinations/${name}`
const config = { headers: { Authorization: `Bearer ${token}` } }
const response = await axios.get(destSrvUrl, config)
return response.data.destinationConfiguration
}
const token = await fetchJwtToken(cc.token_service_url, cc.clientid, cc.clientsecret)
const dest = await areadDestination("myonpremconnection")
const config: AxiosRequestConfig = {
url: dest.URL,
headers: {
"SAP-Connectivity-SCC-Location_ID": dest.CloudConnectorLocationId,
"Proxy-Authorization": `Bearer ${token}`,
},
proxy: {
host: cc.onpremise_proxy_host,
port: parseInt(cc.onpremise_proxy_http_port),
},
}
// now you can call your on-prem system through the connector
const myclient = axios.create(config)
const resp = await myclient.get("/myservice")
Source: sap.com


No comments:
Post a Comment